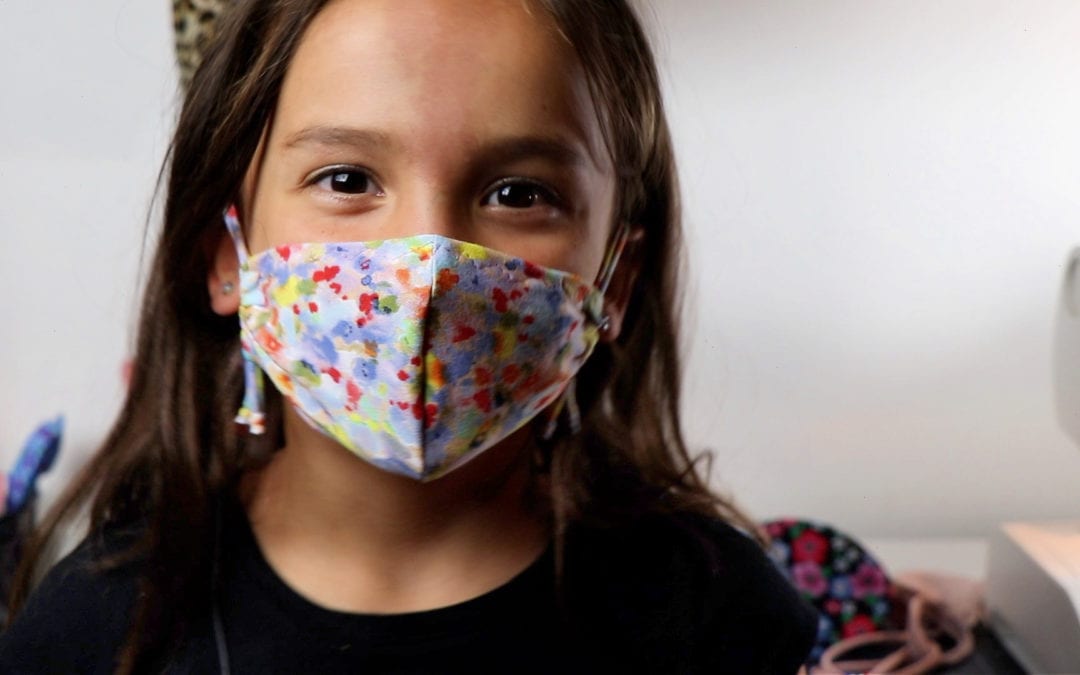
Mini knit mask is fabulous and fast to make!
I want to ask you, have you put any thought into children wearing a face mask, and going back to school? If you have, what do you expect? To put it in perspective, I want you to think about the last time that you worked a job, that you had to wear a uniform tie, a suit, and how that felt. What was the first thing that you did when you got home? You took it off. I don’t think it’s going to be any different with face masks for children, as they returned back to school, asking anyone to wear any garment for an extended period of time, it’s difficult.
My goal was to come up with a solution, something that would be comfortable for them. They could make it through the day and not be thinking about or fidgeting with their face mask. Instead, focusing on their schoolwork. I’m going to share what I came up with, a little beauty, the ‘mini knit mask’, and all the reasons why it’s an ideal solution
So the problem, I think, was solved with a very simple solution: a fabric that I feel is ideal for masks, Lycra. I’ve created a hybrid mask, and I’m so excited about this because we have all the comfort and ability to conform to the face from Lycra, but we have the filtration needed from cotton, and it’s a perfect mix. The ear loops and neck loop both are made out of Lycra spandex. I’ve also created an adjustable neck loop piece here so that the kids can just wear it around their neck.
How to sew this mini knit mask!
To start you’re going to need to buy a great stretch fabric, Lycra cotton. Check your fabric, hold it in your hands, stretch from one inch to three or four inches. If you get that amount of stretch in it, that’s a great fabric for you to be working with for this project.
I’m going to lay my fabric. I’ve got 20 inches on the fold. I’m going to make sure that the stretch is going the length across with my ruler. I’m going to cut two strips here, 20” long by ¾” wide. This will be the neck loop, and I’m going to cut one in half for the ear loops. Next, I’m going to cut the pattern. Also making sure that the stretch is going the width of the pattern, this pattern is made out of plastic template. I’ve got an entire video on great hacks for transferring your patterns into more sustainable, long lasting items.
Now to sew! I’m going to do a stitch connecting the cups together, but first I’m going to put in a stretch knit needle, and I’m also going to use a plastic foot. Those are two tricks to sewing stretch fabrics. Sew 1/4″ seam on the curve center. We’re going to do a top stitch now. I’m going to just flatten the cup left and right, and add ⅛”. I’m going to just sew straight down the center, we just want to tack down that raw edge.
Tailor tips!
Now with tailor’s chalk I’m going to mark ½”from center on the top of the mask and also ½” from center on the bottom of the mask, both left and right sides. I love tailor’s chalk because it just brushes away. It comes in various colors, and it lasts forever.
I’m going to take this beautiful decorative elastic that I got from Hobby Lobby. It’s soft, silky, and stretchy, it’s about ⅝” wide. I am going cut pieces to match those up with the notches I made with the tailor’s chalk. Now, I’m just going to go back in and I’m going to trim on a diagonal cut to allow for the fold, because I’m going to fold this elastic right into the top and bottom hems. It should fold right in.
Now I’m going to set my sewing machine to my favorite three step zigzag also called a multiple stitch zigzag. This stitch goes one, two, three to the right, and one, two, three to the left. And it is the perfect stitch for sewing any type of Lycra, spandex, stretch, knits, or jerseys. Anything that needs to stretch to go over the body. You want to use this stitch and you can set the middle width for your zigzag and about three on your length. To set the stitch you’re going to play with it. I don’t want it any wider than my and ⅜” hem that I’m doing to topstitch.
For the bottom seam, I’m just going to catch that elastic right in the hem. I’m using my pointer here. It’s a little bit thick. It’s going to help me get through that thick spot, or I’m just going to hold it taunt from behind. I never stretch the fabric. You do not stretch stretch fabrics when sewing. Pull it enough just enough to make it nice and flat.

Let’s go fishing!
Now I have my turner that I bought at Joann’s. It’s got a little fishing hook on it, and we’re going to use that. I have the 20 inch strips we cut earlier. If you cut them properly, you should be able to just pull and make a gorgeous elastic string for your ear loop and neck loop. With this turner, I’m going to go in through the casing, and am just going to grab that and hook it like I’m fishing. Then pull it right through.
The same thing with the pony beads. I’m just going to grab that string and just pull it right through those pony beads. You can also knot tightly if you like that look more. Then just turn the ear loops into the casing. Whichever you prefer. One more time with the pony beads with the turner. I’ve got that fabric hooked on there, like I’m fishing. It just comes right through easy peasy. If you’re knotting the ear loops, make sure to make them just a little bit bigger than the length of the mask casing. Otherwise you could use the pony beads to make them adjustable. You can knot off the ends here.
If you want to also make a neck loop, take that second piece of string, and just put it through the ear loops. Finish it with pony beads or a knot. Soon I’ll have a floral lanyard that
I hope you enjoyed learning how to make this beautiful mask, and all the aspects of sewing spandex and creating a face mask. Thanks for reading. I appreciate your joining in and creating this community for me. It gives me a sense of purpose and I love helping you help others!
Be well, keep sewing it’s good for the soul.
Recent Comments